Recipe: Raw Banana Stew aka Vazhakkai Kootu

IMG_5061

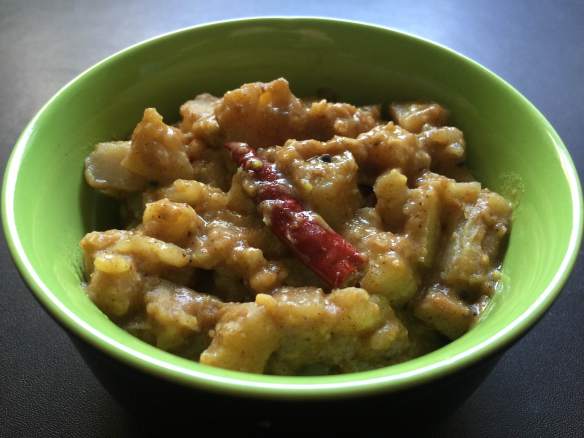
This is one of my favourite kootus, the tanginess combined with the slight sweetness that jaggery imparts along with the crispy coconut flavouring is just yum! I love to eat it as it is, no rice or anything else needed to dress it up for me!

It’s quite versatile also, if you make it a bit runny (like a sambar), it can be eaten with rice. Add some papads or chips to go with it and becomes a delicious meal. When made thicker, it becomes the perfect addition to your meal. Eat with with a rasam or a mor kozambu and lick your fingers!

Vazhakkai Kootu

IMG_5064

Ingredients:
3-4 raw bananas (vazhakai)
3-4 tbsp Toor Dal
1 small lime sized tamarind
2-3 tsps Sambar powder
1.5 tsps oil
1 tsp mustard seeds
1 tsp chana dal
1 tsp broken urad dal
2-3 tbsps coconut
3-4 dried red chillies
1 pinch asafoetida
2 tsps jaggery
Salt to taste

Method:

  • Wash the toor dal and soak it in a some hot water for 10-15 mins. After that pressure cook it and keep aside. Once you can open the cooker, mash the dal well so that it is even.
  • Soak the tamarind in hot to warm water for a while (depending on the size, it should take 20-30 mins). Once it’s soft and cool, mash it with your fingers and extract the juice. You can run it through a seive to make sure you don’t have any fruit in the juice extracted. Alternatively, just buy tamarind paste which is easily available in most Indian stores.
  • In a pan, add the oil and once it is hot, add the mustard seeds. When the seeds begin to crackle, add the chana dal and fry till it starts to change colour. Do not let it get black, as it will then become bitter. Then add the dried red chillies and a pinch of asafoetida and lastly the grated coconut. Keep frying the cocounut until it starts to lose moisture and becomes brown. When the coconut is brown and crisp, remove from the flame and keep aside. We will use this in the end.
  • Peel and chop the raw bananas into small pieces. The pieces should be slightly larger than bite-size. Peel and chop one by one as otherwise the bananas will blacken. While peeling, you can keep a container with water next to you and drop the bananas into it while cutting the next one. This slows the blackening process.
  • When you have chopped all the bananas, cook them in a pan with just enough water to cover them. When the bananas are half cooked, add the tamarind juice to the pan along with sambar powder and salt to taste.
  • Let the tamarind water in the pan come to a rolling boil and let it boil for 5-10 minutes untill the banana is fully cooked. Bananas usually cook very fast so make sure you do not over cook them.
  • Once the bananas are cooked, add in the mashed dal and check for salt. If you want, you can also add the jaggery at the point.
  • When the dal has mixed well with the mixture add the coconut, give it a good stir and switch off the flame.
  • Garnish with a bit of coriander leaves and your delicious vazakkai kootu aka raw banana stew is ready!
  • Serve with rice or rotis for a delicious meal…

Recipes: Mor Keerai aka Greens in Youghurt

Another very typical tambram recipe is this spinach recipe. You can make this using any greens, and though the look of the dish is not that special (at least mine didn’t look very photogenic), the end result is a very tasty dish, which goes equally well with rice or with any Indian bread.

Mor Keerai

IMG_4683Ingredients:

  • 3-4 heaped cups of chopped and washed greens
  • 1 cup yoghurt which is whisked and smooth
  • 1/3 to ½ cup grated coconut
  • 3-4 red chillies
  • 1-2 tsps cumin seeds
  • 1 tbsp Oil or ghee for seasoning
  • 1 tsp Mustard seeds
  • 3-4 red chillies
  • 1 tsp urad dal
  • A pinch of asafetida

Method:

  • Wash the greens well, making sure that all dirt is washed away.
  • In a pan, put the washed greens with a little water and let it cook.
  • In the meantime, using a bit of the yoghurt, grind the coconut, cumin seeds, green chillies into a smooth paste.
  • Once the greens have cooked, using a potato smasher or stick blender, mash it or blend it coarsely. Then add the coconut paste, yoghurt and salt to taste.
    Let it boil for 5-10 mins and switch off the gas
  • In a smaller pan, heat the ghee or oil and when warm, put the mustard seeds. When the splutter, add the urad dal, red chillies and asafetida powder. Once the urad dal starts to brown, remove from the gas and pour over the cooked spinach.

IMG_4680Delicious Mor Keerai is ready to eat. Serve with rice and rasam as a kootu (make it thicker then) or over rice (make it thinner)

Recipes: Pumpkin, Carrot & Coriander Soup

IMG_4709Last week I started craving for soup at work. The thought kept me company until I reached home and made this yummy soup. It was sweet with spicy undertones and extremely delicious. It didn’t take very long to make and is perfect for cold and rainy days!

Carrot, Pumpkin and Coriander Soup

IMG_4711Ingredients:

  • 1 large onion, chopped
  • 7-8 cloves of garlic, roughly chopped
  • 1.5 inch knob of ginger, peeled and roughly chopped
  • 3-4 dry red chillies, halved (can substitute fresh red chillies for this)
  • 1 tbsp cumin seeds
  • 1 to 1.5 tbsps coriander seeds
  • 3 medium carrots, peeled and chopped
  • ¼ orange pumpkin, peeled and chopped
  • Half to one cup chopped coriander (use half for the soup and reserve the rest for the garnish)
  • Low fat milk as desired (to achieve the soup consistency you like)
  • 2 tbsps thick yoghurt
  • 2 tsps Red chilli powder (less or more as per your spice intensity)
  • 2 tbsps Cumin seed powder
  • Salt to taste
  • 2 tsps oil (I used a Olive Canola blend, you can use your normal cooking oil)

Method:

  • Heat oil in a pan and once it’s warm, add in the cumin seeds and coriander seeds.
  • Once they splutter add the dried red chillies (or fresh if that is what you are using) and stir for 30 seconds.
  • Next, add the garlic, ginger and onions in that order, stirring each one for 30 seconds before adding the next ingredient.
  • Once the onions have become translucent add the carrots and stir for a while.
  •  When the carrots become half cooked, which will take around 5-10 minutes, depending on the carrots,  add in the orange pumpkin and a handful of chopped coriander.
  • Add in a bit of salt to help the vegetables cook faster and stir the vegetables once a while.
  • You can also add in some water (about half a cup) and cover the pan to help cook the vegetables faster.
  • Once the vegetables are cooked and cooled, add in the yoghurt and blend using a stick blender or your mixer to a smooth paste. Use milk to help you blend, and get the consistency you like for your soups.
  • Transfer the soup back to the pan and heat it till it achieves a rolling boil. Check for seasoning and add more salt if needed.
  • Add in the balance yoghurt and switch off the gas.
  • Serve with garnishes of yoghurt and coriander leaves.

IMG_4708

Recipes: Green Coriander Chutney

An extremely versatile chutney, this green coriander chutney is also sometimes referred to as Bombay Sandwich chutney as this one is found almost everywhere where you have the roadside sandwich sellers (super yums👍). I’ve been making this chutney for ages and I remember friends telling me to make this when they come over for a meal when we were in college. And now, both BB & GG also love it, especially as a spread for sandwiches..

Green Coriander Chutney

IMG_4554[1]Ingredients:

  • 1 bunch fresh green coriander leaves, chopped, washed and drained of water
  • 1 large onion or 2 small onions, roughly chopped
  • 4-5 pods of garlic (optional)
  • 4-5 green chillies ( more or less depending on your spice tolerance)
  • 1 tsp sugar or sweetener
  • 1-2 tsps lemon juice
  • Salt to taste

Method:

This is very easy. Just put all the ingredients except sugar, salt and lemon juice in a blender and  blend till it’s a smooth purée. Add water a bit by bit, just to get the blender going. Avoid adding too much water to make it thicker. Add the lemon juice, sugar and salt to taste and blend till you achieve the right consistency. Remove and put in a bowl with a lid and refrigerate. This should keep for a week (if it lasts that long that is)

NOTE: Refrigerating the chutney will cut down the spiciness a bit, so if you like it a bit spicy, adjust the green chillies accordingly.

IMG_4553[1]

Receipes: Plum Chutney

I first made this plum chutney on a whim last week. S loved it so much that today he brought loads of Plums for me to recreate it. That’s when I knew it was a winner. This recipe is inspired by Sanjeev Kapoor’s Aloo Bhukare ki Chutney, which I then tweaked to make it my own! This is a super easy recipe with just a handful of ingredients, so read on and enjoy!!

Plum Chutney

IMG_4542[1]Ingredients:

  • 4 red/purple plums
  • 1 small cup raisins
  • 2 tsps cumin seed powder
  • Red chilli powder to taste
  • Salt to taste

Method:

  • In a small bowl, soak the raisins in water for while till they plump up and soften. Using hot water may speed this up.
  • Next chop and deseed the plums and blend the plums and raisins together untill they become a smooth purée.
  • Next take a thick bottomed pan and pour this purée in it. Add salt and red chilli powder and let it start boiling.
  • Once it reaches a rolling boil, and cumin seed powder and stir well.  Let it boil for a while till it thickens.
  • At this point, the colour was slightly brownish with a glaze to the mixture. Once it has thickened to your satisfaction, remove from heat and cool. Once cool, it becomes this rich purple colour.
  • Transfer to a covered dish and refrigerate. This should keep well for upto a week in the fridge.

IMG_4541[1] IMG_4543[1]

This chutney tastes sweet, salty and a bit spicy. If you need to make it more spicy, just increase the chilli while cooking it. It goes well with most Indian food and I also loved having it with bread as a sandwich spread.