Recipe: Brown Rice Sweet Pongal

IMG_5275

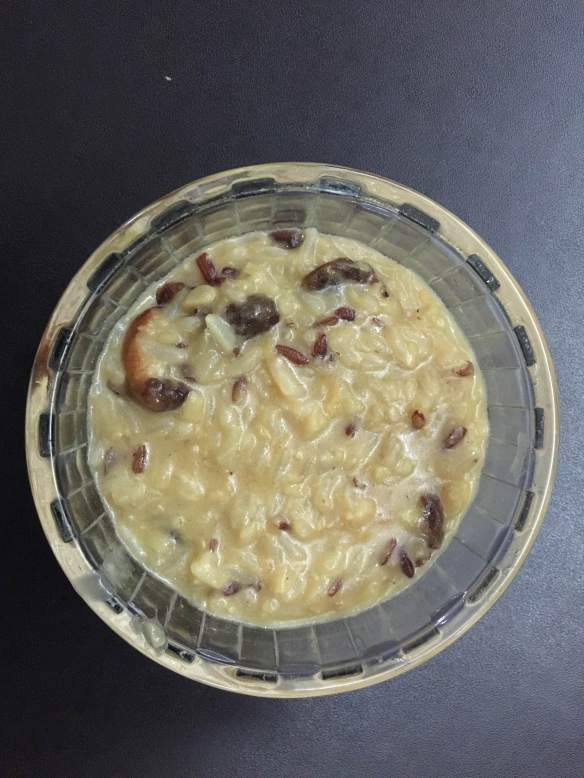
Last week was the festival of Pongal, and as is the tradition I made some sweet Pongal in the morning. The only twist to the recipe was that instead of normal white rice, I used the healthier brown rice. It was quite good, though you need to cook it a tad longer than usual.

IMG_5274

Ingredients:

  • 1 cup brown rice
  • 3 tbsps yellow moong dal
  • ½ cup jaggery (increase this measure to ¾ cup if you like it sweeter)
  • 1 cup milk
  • 2 cups water
  • A handful of cashewnuts
  • A handful of raisins
  • 3-4 tbsps Ghee.

Method:

  • Wash the rice, drain and keep aside.
  • In a largish pressure cooker, dry roast the moong dal for a while till it emits a nice aroma. Do not let it burn.
  • Then add the washed rice, 2 cups of water and 1 cup of milk and pressure cook for 4-6 whistles. Let the pressure come down. You can cook it in a large pot also if you do not have a pressure cooker. In that case, keep an eye on it and add water and milk periodically. You need to cook it till the dal and rice break down and cook, becoming mushy.
  • While the pressure is coming down, in a small skillet, put 1 tbsp ghee and fry the cashewnuts and raisins till the cashewnuts brown and the raisins plump up. Remove and keep aside.
  • Put the jaggery in another container and pour a bit of water over it to cover. It will dissolve in a few seconds. You could also do this in a microwave for 1 minute. Then once the jaggery has dissolved, strain it to remove any impurities present and keep aside.
  • Once you can open the lid of the cooker, add the jaggery, cashewnuts and raisins and cook over a medium flame for 5-10 mins.
  • When the mixture becomes thick, it’s time to remove it from the flame and enjoy!

Picture1

Recipes: Broccoli in Red Gravy

IMG_5182

Broccoli is not a vegetable that you will see in Indian dishes. The first time I tasted this vegetable was when I moved to Singapore. Though these days, you find it in markets in most Indian metros.

Both my children love broccoli as a vegetable, but unfortunately when my helper cooks using this vegetable, she loves to cook it to death. That totally spoils the vegetable for all of this. So this weekend, when I cooked for us, I decided to make an Indian sabzi which would go well with both rotis and rice.

IMG_5184

Ingredients:
3 heads of broccoli, cut into florets
2 onions, chopped roughly
2 tomatoes, roughly chopped
5-6 garlic cloves,
1 inch piece of ginger
1.5 tsps Cumin seeds
1 tsp fennel seeds
½ tsp carom seeds (can omit if not available)
2 tsps coriander seeds
¼ tsp turmeric seeds
1-2 tsps chilli powder
1 -2 tsps Garam Masala Powder
3 tbsps Oil
Salt to taste

Method:
In a pan, warm 2 tbsps oil and then temper with cumin seeds, carom seeds and fennel seeds.
Next add the garlic and ginger and saute them for a few seconds.
Now add the onions and saute till they turn translucent. At this point add the tomatoes and a pinch of salt to help breakdown the water in the tomato and let it cook well.
Once the tomatoes are well cooked, switch off the gas and blend into a smooth paste.
In another pan, heat 1 tbsp oil and when warm add half tsp of cumin seeds and wait for them to pop. When they pop, add the turmeric powder and stir once.
Next add in the washed broccoli and stir for a couple of seconds. Add some salt and cook on a slightly higher heat than normal so that broccoli cooks, but retains it’s crispness.
When the broccoli is almost fully cooked, add in the blended gravy, chilli powder, garam masala powder and adjust for salt.
Let this come to a rolling boil and finish off this dish with some coriander/cilantro garnish.

IMG_5185

Diwali Recipes: 7 Cup Cake

IMG_5059

This is another traditional tambram recipe and which is one of my go-to recipes when I need to make something quickly. It does take a bit of time to make, but the efforts are super worth it! The ingredients are given as cups which is where the name of the recipe came from, but essentially it’s just a measure. It doesn’t matter how big your cup size is, just use the same amount for all the ingredients and your cake or barfi will come out fab!

IMG_5057

Ingredients:

  • 1 cup chickpea flour or besan
  • 1 cup ghee
  • 1 cup grated coconut (you can fresh or frozen, I’ve used fresh for this recipe)
  • 1 cup Milk
  • 3 cups Sugar

Method:

  • Take a big plate or cake tin and grease it slightly. Or, you could lightly spray it with oil and then put baking paper over to completely cover it, this reduces the amount of ghee used in the recipe slightly.
  • Fry the chickpea flour or besan in a dry pan and do not overfry it. Stop when it starts changing colour. At this point, add the coconut, sugar and milk to the pan and continue stirring.
  • When the sugar starts to dissolve, add the ghee and keep stirring. You will need to keep stirring the pan, so that the mixture does not catch in the bottom.
  • After about 15 minutes (more or less depending on your quantity), the mixture will start leaving the sides of the pan. At this point, take a few drops and put it in your greased plate. If it stays in shape, it is ready, otherwise continue stirring and repeating this step till you get to this point.
  • Switch off the gas and pour it into your prepared greased plate. Using a clean spatula, level the mixture and make it smooth. Let it cool for a while and when still slightly warm, lightly score lines in the mixture with a knife or pizza cutter. You could cut squares or diamonds in any size. Let it cool completely before transferring to an airtight container.

This should be good for a week or so outside and around 2 weeks or so inside the fridge.

IMG_5060

Diwali Recipes: Coconut Barfi

IMG_5052

Another typical recipe, this one also needs a good bit of stirring so a good arms workout with this one!

IMG_5053
Ingredients:

  • 2 cups grated coconut
  • 1.5 cups Sugar
  • ½ tsp Cardamom Powder
  • 1 cup Water

Method:

  • Take a big plate or cake tin and grease it slightly. Or, you could lightly spray it with oil and then put baking paper over to completely cover it, this reduces the amount of ghee used in the recipe slightly.
  • For this recipe, you need only the white part of the grated coconut. If you plan to grate your own, stop at the point when the brown part starts getting grated. Or you could do what I did, which was to buy freshly grated coconut from your local Indian store.
  • In a pan, saute the grated coconut till you get a nice aroma from it. Do not let it brown. Remove it from the pan and add the sugar and water and let it come to a rolling boil. You can also add a couple of teaspoons of milk to the mixture so that any dirt in the sugar comes up and you can remove it. This trick also makes the barfi more white which is aesthetically more pleasing. At this point, reduce the flame and let it boil till it thickens to a single string consistency.
  • This means that when you take a drop of the mixture from the flame and touch it with your thumb and index finger, it will stick to both fingers and form a kind of string.
  • When the sugar mixture reaches this point, add the grated coconut and stir for a couple of minutes. Add the cardamom powder and continue to stir at a low to medium flame. When the coconut completely absorbs the sugar water mixture and starts to leave the sides, it’s time to take it off the flame. You can also test it by putting a couple of drops in the greased tray. If it stays in shape, it’s time to remove it from the flame, otherwise continue stirring and repeating this step till you get to this point.
  • Switch off the gas and pour it into your prepared greased plate. Using a clean spatula, level the mixture and make it smooth. Let it cool for a while and when still slightly warm, lightly score lines in the mixture with a knife or pizza cutter. You could cut squares or diamonds in any size. Let it cool completely before transferring to an airtight container. This should be good for a week or so outside and slightly more inside the fridge.

IMG_5056

Diwali Recipes: Diwali Legiyam

Diwali is the one time, when everybody, irrespective on their take on fitness and healthy eating, throws all of it out of the window and eats like there’s no tomorrow! You start the day early and start stuffing your mouth (and stomach) and stop probably four days later, when either you can’t have another morsel or you’ve run out of goodies to eat!

IMG_5065

The legiyam is traditionally eaten as soon as you take your bath and pray and much before you start stuffing your mouth with all the delicacies. This legiyam is an herbal medicine, made with things found in your pantry to strengthen your digestive system. This medicine also helps the body adjust to the changes in the temperature when autumn moves to winter. This medicine re-ignites the digestive fire, digests toxic build-up in the body and helps us fight the ill-effects of the heavy foods that we may indulge in at this time.

Each family has its own traditional recipe and the recipe below is the one my mom makes. Most people I know do not cook according to a recipe, they just have approximate amounts and then cook as they go along, adjusting the recipe to suit palates. I made the recipe slightly sweeter than what she suggested as I know S & BB can’t take spicy food, so if you can eat the spicy ginger, then go ahead and reduce the amount of jaggery in the recipe.

IMG_5067

Ingredients:

  • 150 gms of ginger, peeled and chopped into smaller pieces
  • 3 tsps of coriander seeds
  • 1.5 tsps of cumin seeds
  • 1.5 tsps of whole black peppers
  • 10 pieces of cardamom, only use the pods, discard the outer covering
  • 10 pieces of cloves
  • 10 pieces of thippili
  • ¾ tsp of cinnamon powder (you can use a 1 inch piece instead)
  • 2 tsps of dry ginger powder (saunth/sukku)
  • 1 cup (less or more) jaggery (according to taste)
  • 3-5 tbsps of ghee (according to taste)

Method:

  • In a largish bowl, put the coriander seeds, cumin seeds, black peppers, cardamom pods, cloves, thippili, cinnamon powder and dry ginger powder and soak them for around 10-15 minutes.
  • While the above are soaking, peel and chop the ginger into smallish pieces (this depends on the size of the mixer you will be using).
  • Grind the ginger and when it becomes a paste, add in the soaked ingredients and continue grinding till it becomes a smooth paste
  • Then in a non-stick pan, add the paste and start boiling it. The paste will be quite watery at first due to the water content, but as you cook it, it will gradually get harder. At this point, add the jaggery and 1-2 tbsps of ghee. You may want to add the jaggery a bit by bit, tasting as you go along so that you add only the right amount and it does not taste too spicy. The ghee will help it cook and when it reaches the consistency where the mixture starts leaving the sides of the bowl, it is ready. Remove from the flame and cook.

Have this first thing in the morning when you are going to indulge in heavy food and this will definitely help your stomach! This keeps for a few weeks in the fridge.